Mi piace pensare sempre a qualcosa d'innovativo e mi sono posto la domanda :
qualcuno ha mai installato un piranometro sul raspberry
e magari su Metern?
Secondo Voi è possibile?
magari usando questi sensori ?
TSL2561
BH1750FVI
Piranometro Arduino, qualcuno l'ha installato?

Re: Piranometro Arduino, qualcuno l'ha installato?
Ci sono in rete diversi script già pronti per usare questi sensori con raspberry. Ad esempio.
TSL2561
https://www.instructables.com/id/Lux-Se ... pberry-Pi/
http://www.raspberryconnect.com/hardwar ... ible-light
BH1750FVI
https://www.raspberrypi-spy.co.uk/2015/ ... ty-sensor/
http://domoticx.com/raspberry-pi-lichts ... 50-gy-302/
Si tratta solo di scegliere quello che più fa al caso nostro ed adattare lo script perchè formatti i dati secondo lo standard di metern e li salvi nei soliti file temporanei in /dev/shm/
Re: Piranometro Arduino, qualcuno l'ha installato?
Grazie Flane quale pensi sia la soluzione più precisa?

Re: Piranometro Arduino, qualcuno l'ha installato?
Ciao Dolam.
Se hai intenzione di misurare il livello di illuminamento (lux) da parte del sole sulla terra, la vedo un pò dura. Tieni conto che l'illuminamento medio della luce solare varia da 32.000 lx a 100.000 lx e que due sensori non sono adatti: il primo misura fino a 40.000 lx; il secondo misura fino a 65535 lx. Bisognerebbe trovare, sempre che esista, un sensore che misuri molto di più.
Saluti.
Re: Piranometro Arduino, qualcuno l'ha installato?
e se lo installiamo sotto un vetro che riduce del 50% l'illuminazione solare e poi si moltiplica il risultato per due, è fattibile?
Re: Piranometro Arduino, qualcuno l'ha installato?
Andando a rileggere più attentamente il datasheet del BH1750FVI, ho visto che questo sensore può rilevare minimo 0,11 lx, fino a 100.000 lx, selezionando uno dei due tipi di "I2C address slave" possibili. Non ho idea di cosa voglia dire, ma ho voluto provare ugualmente ed il sensore ha rilevato un max di 54.612,50 lx (ore 13 con cielo leggermente velato); quindi non è arrivato nemmeno al valore max dichiarato di 65535 lx. 
Ho utilizzato i due file python suggeriti da Flane, leggermente diversi tra loro con lo stesso risultato.
Qualcuno sa come rimediare. Grazie.
Ho utilizzato i due file python suggeriti da Flane, leggermente diversi tra loro con lo stesso risultato.
Qualcuno sa come rimediare. Grazie.
Re: Piranometro Arduino, qualcuno l'ha installato?
Salve a tutti.
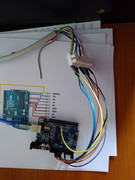
Dopo aver cercato a lungo sul web, ho deciso di collegare il sensore BH1750 ad Arduino Uno e questo al PC tramite USB. Ho trovato lo sketch sotto e tramite PLX-DAQ 2.11, rilevo i dati del sensore fino a 100k .
.
Dopo aver cercato a lungo sul web, ho deciso di collegare il sensore BH1750 ad Arduino Uno e questo al PC tramite USB. Ho trovato lo sketch sotto e tramite PLX-DAQ 2.11, rilevo i dati del sensore fino a 100k
Codice: Seleziona tutto
// BH1750.ino
// ----------
// 17 august 2016
//     First version by Koepel. Public Domain.
//     Tested with Arduino Uno and Arduino.cc IDE 1.6.9
//     In 2016, there are about 10 to 20 libraries for the BH1750,
//     but I was not happy with the existing code.
//     I started from scratch and tried to get the maximum out of the sensor.
//
//
//
//
// Light sensor BH1750FVI info
// ---------------------------
// Manufacturer : Rohm Semiconductor, Japan.
// Normal range : 1 lux to 65535 lux
// Extended range : 0.11 lux to 100k lux (by adjusting the measurement time)
// There is a Japanese and English datasheet.
// The newest datasheet is "2011.11 - Rev.D" for both languages.
//
// The power usage in power down mode is typical 0.01 uA, and maximum 1.0 uA.
// That current is measured with no light.
// The 1.0 uA is hundred times more than 0.01 uA.
// It it not known why it is such a big difference, or why it was measured with no light.
//
//
// Sensor in the dark
// ------------------
// The sensor is not very accurate with 20% measurement variation.
// The best resolution is 0.11 lux.
// That means that light below 0.11 lux can not be measured.
// One lux is the light from a candle at 1 meter distance.
// Moonlight is about 0.5 lux.
// A LDR with a high resistor value (200k) and with averaging in software is able to detect below 1 lux.
// The maximum time to collect light for the BH1750 is about 441 ms.
// It is not possible to lengthen that time.
// Sensitive photo diodes can measure 1 mlx (0.001 lux).
//
//
// Sensor in bright light
// ----------------------
// The sensor should perhaps be able to (almost) measure direct sunlight with the 100k lux range,
// but the sensor is not ment to be used in direct sunlight.
// The best way to measure bright light, is by placing the sensor under semi-transparant material.
// The maximum temperature is 85 degrees Celsius.
//
//
// BH1750 Software interface
// -------------------------
// It is a chip for 3.0 or 3.3V and uses I2C up to 400kHz.
// The BH1750FVI can receive one byte, and two bytes can be read from it.
// It does not support a repeated start.
// The one byte that is send can be a command or a few data bits for the measurement time register.
// The two bytes that are received is the light intensity.
//
// It might be possible to have many BH1750s connected to the I2C bus and select just
// one by changing the I2C address with the ADDR pin of that one sensor. Not tested yet.
//
// Only 3 commands of the possible 16 (the lower nibble) are used.
// It is not known if there are other undocumented commands.
//
//
// Measurement and test results
// ----------------------------
// 1 )
// It is not possible to detect light below 0.11 lux.
// There is no noise that can be averaged to get below it.
//
// 2 )
// There is sometimes a difference between the normal high resolution
// and the high resolution mode2. Sometimes 0.5 lux.
// When automatically changing between the two, perhaps changing at a higher
// lux is better, for example at 50 or 100 lux and not at 10 lux.
//
// 3 )
// With the high resulotion and minimal time measurement period, the
// lux can go up to 120k lux in direct sunlight.
// (The sensor is for ambient light, not for direct sunlight)
//
// 4 )
// There is no status bit or interrupt to indicate that the sensor has finished measuring.
// During the measurement time, the sensor does acknowledge to its I2C address in a normal way,
// and does return the value of the illuminance data register. That is however,
// the data of the previous measurement.
// When the measurement time has finished, the new value will be written
// in the illuminace data register.
// A reset command clears the illuminance data register, therefor that can be
// used to determine if a new value is ready, unless it was very dark
// and the light was 0 lux.
//
// 5 )
// Measurement times
//    low resolution  : typical 16 ms, max 24 ms, measured : 18 ms
//    high resolution : typical 120 ms, max 180 ms, measured : 134 ms
//


#include <Wire.h>

// The I2C address is 0x23 (ADDR pin is low) or 0x5C (ADDR pin is high).
#define BH1750_I2C_ADDRESS_1        0x23
#define BH1750_I2C_ADDRESS_2        0x5C

#define BH1750_POWER_DOWN           0x00    // Stop all operations
#define BH1750_POWER_ON             0x01    // Power on and wait for measurement command
#define BH1750_RESET                0x07    // Clears the illuminance data register, does not work in power down.
#define BH1750_CONT_H_RES_MODE      0x10
#define BH1750_CONT_H_RES_MODE2     0x11
#define BH1750_CONT_L_RES_MODE      0x13
#define BH1750_ONE_TIME_H_RES_MODE  0x20
#define BH1750_ONE_TIME_H_RES_MODE2 0x21
#define BH1750_ONE_TIME_L_RES_MODE  0x23
#define BH1750_MEAS_TIME_H          0x40
#define BH1750_MEAS_TIME_L          0x60


// Moving average array.
// A "moving average" is also called "rolling average" or "running average".
#define NUM_SAMPLES_AVG   10
float moving_avg[NUM_SAMPLES_AVG];
int index_avg;


const int _i2c_address = BH1750_I2C_ADDRESS_1;


// The default correction factor to calculate the lux is 1.2.
// Adjust it when you are able to calibrate the BH1750.
// According to the datasheet, the value can be 0.96 to 1.44.
// It is not know if this correction factor is the same for the whole range.
const float BH1750_factor = 1.2;


void setup()
{
  Serial.begin( 9600);
  Serial.println(F( "\nBH1750 lux sensor"));

  Wire.begin();

  // Start the sensor and test if the I2C address is right.
  int error = BH1750_begin();
  if( error != 0)
    Serial.println(F( "Error, BH1750 not found"));

  // Initialize the moving average array.
  for( int i=0; i<NUM_SAMPLES_AVG; i++)
  {
    moving_avg[i] = 0.0;                        // or fill it with the actual current lux value.
  }
  index_avg = 0;
}


void loop()
{

  // ----------------------------------------
  // Low Resolution
  // ----------------------------------------
  // Low resolution could be a quick check of the light intensity.
  // It could be used to determine which high resolution mode will be used.
  write8( BH1750_POWER_ON);
  write8( mt_H( 69));             // default
  write8( mt_L( 69));             // default
  write8( BH1750_ONE_TIME_L_RES_MODE);
  delay( 24);    // typical 16ms, maximum 24ms
  uint16_t x = read16();
  // Divide the result by a factor of 1.2 (default value)
  // The resulting lux is calculated with float numbers.
  float lux_lowres = (float) x / BH1750_factor;        // BH1750_factor is usually 1.2


  // ----------------------------------------
  // High Resolution
  // ----------------------------------------
  // Normal request of the lux in one time high resolution mode.
  write8( BH1750_POWER_ON);
  write8( mt_H( 69));             // default
  write8( mt_L( 69));             // default
  write8( BH1750_ONE_TIME_H_RES_MODE);
  delay( 180);    // typical 120ms, maximum 180ms
  uint16_t a = read16();
  // Divide the result by a factor of 1.2 (default value)
  // The resulting lux is calculated with float numbers.
  float lux = (float) a / BH1750_factor;              // BH1750_factor is usually 1.2


  // ----------------------------------------
  // High Resolution Mode2 with maximum measurement time
  // ----------------------------------------
  // Extra sensitive 0.11 lux resolution.
  // The MTregister is default 69.
  // It can be minimal 31 and maximum 254
  write8( BH1750_POWER_ON);
  write8( mt_H( 254));          // maximum value of measurement time
  write8( mt_L( 254));
  write8( BH1750_ONE_TIME_H_RES_MODE2);
  delay( 662);           // 180 * 254 / 69
  uint16_t b = read16();
  float lux_dark = (float) b / BH1750_factor * ( 69.0 / 254.0 ) / 2.0;      // BH1750_factor is usually 1.2


  // ----------------------------------------
  // High resultion with minimum measurement time
  // ----------------------------------------
  // Extra range for bright light up to 100000 lux
  // The calculation could result into a lux value up to 120 klx (120000 lux).
  // Normal High Resolution mode, with minimal time measurement (31 is minimum for MTregister).
  write8( BH1750_POWER_ON);
  write8( mt_H( 31));          // lowest value of measurement time
  write8( mt_L( 31));
  write8( BH1750_ONE_TIME_H_RES_MODE);
  delay( 81);            // 180 * 31 / 69
  uint16_t c = read16();
  float lux_light = (float) c / BH1750_factor * ( 69.0 / 31.0 );       // BH1750_factor is usually 1.2
  Serial.print( (String) "DATA,DATE,TIME,TIMER," + ",AUTOSCROLL_20");
  Serial.print(",");
  Serial.println( lux_light);

  // ----------------------------------------
  // moving average
  // ----------------------------------------
  moving_avg[index_avg] = lux_dark;

  // Calculate the average.
  float total_avg = 0.0;
  for( int i=0; i<NUM_SAMPLES_AVG; i++)
  {
    total_avg += moving_avg[i];
  }
  total_avg /= (float) NUM_SAMPLES_AVG;

  // advance index for the moving average array.
  index_avg++;
  if( index_avg >= NUM_SAMPLES_AVG)
    index_avg = 0;


  delay( 1000);
}


int BH1750_begin()
{
  // Send command 'RESET' for extra safety.
  // A 'RESET' is only valid with power on.
  // A 'RESET' only resets the illuminace data register.
  //
  // Three checks if the communication with the sensor is okay.
  // No more error checks after this.

  int error = 0;

  error = write8( BH1750_POWER_ON);
  if( error != 0)
    return( error);

  error = write8( BH1750_RESET);
  if( error != 0)
    return( error);

  error = write8( BH1750_POWER_DOWN);
  if( error != 0)
    return( error);

  return( error);
}


inline uint8_t mt_H( uint8_t mt)
{
  return( BH1750_MEAS_TIME_H | (mt >> 5));  // highest 3 bits
}

inline uint8_t mt_L( uint8_t mt)
{
  return( BH1750_MEAS_TIME_L | (mt & 0x1F));   // lowest 5 bits
}


// Read the two bytes from the BH1750
// If an error occurs, then zero is returned.
uint16_t read16()
{
  uint16_t x;
  int n = Wire.requestFrom( _i2c_address, 2);
  if( n == 2)
  {
    byte highbyte = Wire.read();              // highest byte first
    byte lowbyte  = Wire.read();
    x = word( highbyte, lowbyte);
  }
  else
  {
    x = 0;
    Serial.println("ERROR I2C fail 1");          // for debugging
  }
  return( x);
}


// Write the command byte to the BH1750
// An error is returned, it is zero for no error.
int write8( uint8_t command)
{
  Wire.beginTransmission( _i2c_address);
  Wire.write( command);
  int error = Wire.endTransmission();

  if( error != 0)                               // for debugging
    Serial.println("ERROR I2C fail 2");         // for debugging

  return( error);
}
Re: Piranometro Arduino, qualcuno l'ha installato?
Piranometro con servomotore.
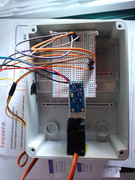
Funziona perfettamente.
Codice: Seleziona tutto
// BH1750+servo.ino
// ----------
// 17 august 2016
//     First version by Koepel. Public Domain.
//     Tested with Arduino Uno and Arduino.cc IDE 1.6.9
//     In 2016, there are about 10 to 20 libraries for the BH1750,
//     but I was not happy with the existing code.
//     I started from scratch and tried to get the maximum out of the sensor.
//
//
//
//
// Light sensor BH1750FVI info
// ---------------------------
// Manufacturer : Rohm Semiconductor, Japan.
// Normal range : 1 lux to 65535 lux
// Extended range : 0.11 lux to 100k lux (by adjusting the measurement time)
// There is a Japanese and English datasheet.
// The newest datasheet is "2011.11 - Rev.D" for both languages.
//
// The power usage in power down mode is typical 0.01 uA, and maximum 1.0 uA.
// That current is measured with no light.
// The 1.0 uA is hundred times more than 0.01 uA.
// It it not known why it is such a big difference, or why it was measured with no light.
//
//
// Sensor in the dark
// ------------------
// The sensor is not very accurate with 20% measurement variation.
// The best resolution is 0.11 lux.
// That means that light below 0.11 lux can not be measured.
// One lux is the light from a candle at 1 meter distance.
// Moonlight is about 0.5 lux.
// A LDR with a high resistor value (200k) and with averaging in software is able to detect below 1 lux.
// The maximum time to collect light for the BH1750 is about 441 ms.
// It is not possible to lengthen that time.
// Sensitive photo diodes can measure 1 mlx (0.001 lux).
//
//
// Sensor in bright light
// ----------------------
// The sensor should perhaps be able to (almost) measure direct sunlight with the 100k lux range,
// but the sensor is not ment to be used in direct sunlight.
// The best way to measure bright light, is by placing the sensor under semi-transparant material.
// The maximum temperature is 85 degrees Celsius.
//
//
// BH1750 Software interface
// -------------------------
// It is a chip for 3.0 or 3.3V and uses I2C up to 400kHz.
// The BH1750FVI can receive one byte, and two bytes can be read from it.
// It does not support a repeated start.
// The one byte that is send can be a command or a few data bits for the measurement time register.
// The two bytes that are received is the light intensity.
//
// It might be possible to have many BH1750s connected to the I2C bus and select just
// one by changing the I2C address with the ADDR pin of that one sensor. Not tested yet.
//
// Only 3 commands of the possible 16 (the lower nibble) are used.
// It is not known if there are other undocumented commands.
//
//
// Measurement and test results
// ----------------------------
// 1 )
// It is not possible to detect light below 0.11 lux.
// There is no noise that can be averaged to get below it.
//
// 2 )
// There is sometimes a difference between the normal high resolution
// and the high resolution mode2. Sometimes 0.5 lux.
// When automatically changing between the two, perhaps changing at a higher
// lux is better, for example at 50 or 100 lux and not at 10 lux.
//
// 3 )
// With the high resulotion and minimal time measurement period, the
// lux can go up to 120k lux in direct sunlight.
// (The sensor is for ambient light, not for direct sunlight)
//
// 4 )
// There is no status bit or interrupt to indicate that the sensor has finished measuring.
// During the measurement time, the sensor does acknowledge to its I2C address in a normal way,
// and does return the value of the illuminance data register. That is however,
// the data of the previous measurement.
// When the measurement time has finished, the new value will be written
// in the illuminace data register.
// A reset command clears the illuminance data register, therefor that can be
// used to determine if a new value is ready, unless it was very dark
// and the light was 0 lux.
//
// 5 )
// Measurement times
//    low resolution  : typical 16 ms, max 24 ms, measured : 18 ms
//    high resolution : typical 120 ms, max 180 ms, measured : 134 ms
//

 # define MOTORE    8
      # define FOTOuno  A0
      # define FOTOdue  A1

      #include <Servo.h>


      Servo myservo;
      int Value        = 0;
      int Centrato     =90;
      int sensorValue1 = 0;
      int sensorValue2 = 0;

#include <Wire.h>

// The I2C address is 0x23 (ADDR pin is low) or 0x5C (ADDR pin is high).
#define BH1750_I2C_ADDRESS_1        0x23
#define BH1750_I2C_ADDRESS_2        0x5C

#define BH1750_POWER_DOWN           0x00    // Stop all operations
#define BH1750_POWER_ON             0x01    // Power on and wait for measurement command
#define BH1750_RESET                0x07    // Clears the illuminance data register, does not work in power down.
#define BH1750_CONT_H_RES_MODE      0x10
#define BH1750_CONT_H_RES_MODE2     0x11
#define BH1750_CONT_L_RES_MODE      0x13
#define BH1750_ONE_TIME_H_RES_MODE  0x20
#define BH1750_ONE_TIME_H_RES_MODE2 0x21
#define BH1750_ONE_TIME_L_RES_MODE  0x23
#define BH1750_MEAS_TIME_H          0x40
#define BH1750_MEAS_TIME_L          0x60


// Moving average array.
// A "moving average" is also called "rolling average" or "running average".
#define NUM_SAMPLES_AVG   10
float moving_avg[NUM_SAMPLES_AVG];
int index_avg;


const int _i2c_address = BH1750_I2C_ADDRESS_1;


// The default correction factor to calculate the lux is 1.2.
// Adjust it when you are able to calibrate the BH1750.
// According to the datasheet, the value can be 0.96 to 1.44.
// It is not know if this correction factor is the same for the whole range.
const float BH1750_factor = 1.2;


void setup()
  { pinMode (MOTORE, OUTPUT);
  pinMode (FOTOuno, INPUT);
  pinMode (FOTOdue, INPUT);
  myservo.attach(MOTORE);
  Serial.begin( 9600);
  Serial.println(F( "\nBH1750 lux sensor"));

  Wire.begin();

  // Start the sensor and test if the I2C address is right.
  int error = BH1750_begin();
  if( error != 0)
    Serial.println(F( "Error, BH1750 not found"));

  // Initialize the moving average array.
  for( int i=0; i<NUM_SAMPLES_AVG; i++)
  {
    moving_avg[i] = 0.0;                        // or fill it with the actual current lux value.
  }
  index_avg = 0;
}


void loop()
{
        int sensorValue = analogRead(FOTOuno);
        int sensorValue2 = analogRead(FOTOdue);

        Value=(sensorValue-sensorValue2)/10;

          if   (Value==0) myservo.detach();//scollega MOTORE
          else myservo.attach(MOTORE);

          if ( Value>10 )
             { Value=10;}

          if ( Value<-10 )
             { Value=-10;}
        Serial.println(Value);
        myservo.write(Centrato+Value);

  // ----------------------------------------
  // Low Resolution
  // ----------------------------------------
  // Low resolution could be a quick check of the light intensity.
  // It could be used to determine which high resolution mode will be used.
  write8( BH1750_POWER_ON);
  write8( mt_H( 69));             // default
  write8( mt_L( 69));             // default
  write8( BH1750_ONE_TIME_L_RES_MODE);
  delay( 24);    // typical 16ms, maximum 24ms
  uint16_t x = read16();
  // Divide the result by a factor of 1.2 (default value)
  // The resulting lux is calculated with float numbers.
  float lux_lowres = (float) x / BH1750_factor;        // BH1750_factor is usually 1.2


  // ----------------------------------------
  // High Resolution
  // ----------------------------------------
  // Normal request of the lux in one time high resolution mode.
  write8( BH1750_POWER_ON);
  write8( mt_H( 69));             // default
  write8( mt_L( 69));             // default
  write8( BH1750_ONE_TIME_H_RES_MODE);
  delay( 180);    // typical 120ms, maximum 180ms
  uint16_t a = read16();
  // Divide the result by a factor of 1.2 (default value)
  // The resulting lux is calculated with float numbers.
  float lux = (float) a / BH1750_factor;              // BH1750_factor is usually 1.2


  // ----------------------------------------
  // High Resolution Mode2 with maximum measurement time
  // ----------------------------------------
  // Extra sensitive 0.11 lux resolution.
  // The MTregister is default 69.
  // It can be minimal 31 and maximum 254
  write8( BH1750_POWER_ON);
  write8( mt_H( 254));          // maximum value of measurement time
  write8( mt_L( 254));
  write8( BH1750_ONE_TIME_H_RES_MODE2);
  delay( 662);           // 180 * 254 / 69
  uint16_t b = read16();
  float lux_dark = (float) b / BH1750_factor * ( 69.0 / 254.0 ) / 2.0;      // BH1750_factor is usually 1.2


  // ----------------------------------------
  // High resultion with minimum measurement time
  // ----------------------------------------
  // Extra range for bright light up to 100000 lux
  // The calculation could result into a lux value up to 120 klx (120000 lux).
  // Normal High Resolution mode, with minimal time measurement (31 is minimum for MTregister).
  write8( BH1750_POWER_ON);
  write8( mt_H( 31));          // lowest value of measurement time
  write8( mt_L( 31));
  write8( BH1750_ONE_TIME_H_RES_MODE);
  delay( 81);            // 180 * 31 / 69
  uint16_t c = read16();
  float lux_light = (float) c / BH1750_factor * ( 69.0 / 31.0 );       // BH1750_factor is usually 1.2
  Serial.print( (String) "DATA,DATE,TIME,TIMER," + ",AUTOSCROLL_20");
  Serial.print(",");
  Serial.println( lux_light);

  // ----------------------------------------
  // moving average
  // ----------------------------------------
  moving_avg[index_avg] = lux_dark;

  // Calculate the average.
  float total_avg = 0.0;
  for( int i=0; i<NUM_SAMPLES_AVG; i++)
  {
    total_avg += moving_avg[i];
  }
  total_avg /= (float) NUM_SAMPLES_AVG;

  // advance index for the moving average array.
  index_avg++;
  if( index_avg >= NUM_SAMPLES_AVG)
    index_avg = 0;


  delay( 1000);
}


int BH1750_begin()
{
  // Send command 'RESET' for extra safety.
  // A 'RESET' is only valid with power on.
  // A 'RESET' only resets the illuminace data register.
  //
  // Three checks if the communication with the sensor is okay.
  // No more error checks after this.

  int error = 0;

  error = write8( BH1750_POWER_ON);
  if( error != 0)
    return( error);

  error = write8( BH1750_RESET);
  if( error != 0)
    return( error);

  error = write8( BH1750_POWER_DOWN);
  if( error != 0)
    return( error);

  return( error);
}


inline uint8_t mt_H( uint8_t mt)
{
  return( BH1750_MEAS_TIME_H | (mt >> 5));  // highest 3 bits
}

inline uint8_t mt_L( uint8_t mt)
{
  return( BH1750_MEAS_TIME_L | (mt & 0x1F));   // lowest 5 bits
}


// Read the two bytes from the BH1750
// If an error occurs, then zero is returned.
uint16_t read16()
{
  uint16_t x;
  int n = Wire.requestFrom( _i2c_address, 2);
  if( n == 2)
  {
    byte highbyte = Wire.read();              // highest byte first
    byte lowbyte  = Wire.read();
    x = word( highbyte, lowbyte);
  }
  else
  {
    x = 0;
    Serial.println("ERROR I2C fail 1");          // for debugging
  }
  return( x);
}


// Write the command byte to the BH1750
// An error is returned, it is zero for no error.
int write8( uint8_t command)
{
  Wire.beginTransmission( _i2c_address);
  Wire.write( command);
  int error = Wire.endTransmission();

  if( error != 0)                               // for debugging
    Serial.println("ERROR I2C fail 2");         // for debugging

  return( error);
}
Funziona perfettamente.
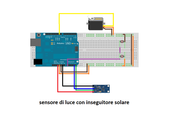
Re: Piranometro Arduino, qualcuno l'ha installato?
Questo è lo schema di collegamento
Chi c’è in linea
Visitano il forum: Nessuno e 11 ospiti