Questa è una vecchia versione del documento!
La presente guida è non completa in quanto in fase di realizzazione. Appena pronta, testata e verificata, il presente messaggio verrà rimosso.
Sensore di temperatura ed umidità DHT22
Il sensore DHT22 è di dimensioni molto ridotte e opera attraverso una tensione di alimentazione tra 3.3 e 6Vcc comunicando entrambi i dati attraverso un solo pin. E’ in grado di misurare temperature che vanno da -40 a 80°C, con una precisione di ±0.5°C, e di rilevare il livello di umidità relativa compresa tra 0 e 100%, con una precisione di ±2%. Il sensore fornisce uscite calibrate in maniera completamente digitale per le due misure. Non è compatibile col protocollo 1-Wire® pur avendo un’unica uscita.
Infatti se si vogliono collegare più sensori ad un dispositivo bisogna predisporre una connessione per ogni sensore (una diversa linea GPIO del Raspberry per ogni sensore).
Rispetto al modello DHT11, questo sensore è più preciso, più accurato e copre un range più esteso di temperatura e umidità.
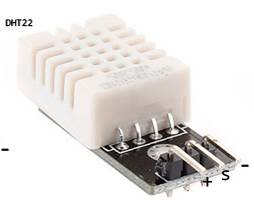
| Versione base | Versione su schedina |
 |  |
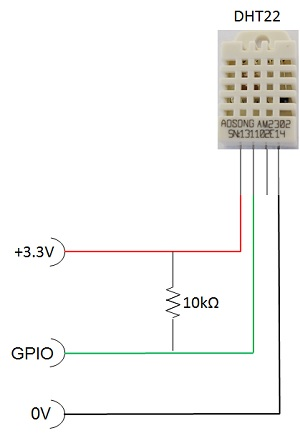
| Necessita della resistenza esterna da 10k (vedi schema sotto) | Non necessità della resistenza di pull-up da 10K in quanto già presente sulla schedina |
Specifiche tecniche:
- Tensione operativa: 3.3 ~ 6Vcc
- Range di misura temperatura: -40~80 °C ± 0.5°C
- Range di misura umidità: 0-100% (relativa) ±2%
- Interfaccia: digitale
- Risoluzione: 1°C, 8bit
- Tempo di risposta: 2s
- Strip connessione: 2.54mm
- Dimensioni: 15 x 25 x 7.7 mm, foro 3mm
Datasheet: Datasheet sensore DHT22 Altro datasheet
In questo appendice vedremo come rilevare misure di temperatura e umidità con il sensore DHT22 ed il nostro Raspberry Pi con MeterN.
MATERIALE:
- 1x Sensore DHT22
- 1x Resistenza da 10 kΩ (non necessaria per la versione su schedina)
- Cavetti vari
L’utilizzo di questo sensore e molto semplice grazie alla libreria per Raspberry Adafruit_Python_DHT.
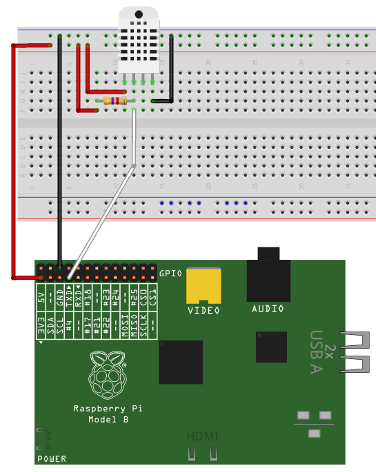
Il circuito da realizzare è il seguente:
Installiamo il software necessario per la lettura dei sensori:
cd /home/pi
git clone https://github.com/adafruit/Adafruit_Python_DHT.git
cd Adafruit_Python_DHT/
sudo apt-get install build-essential python-dev
python setup.py build
sudo python setup.py install
Creiamo il file ADHT_metern.py:
nano /usr/local/bin/ADHT_metern.py
ATTENZIONE: essendo un file python è importante mantenere le spaziature e l’indentatura\
- /usr/local/bin/ADHT_metern.py
#!/usr/bin/python
# Copyright (c) 2014 Adafruit Industries
# Author: Tony DiCola

# Permission is hereby granted, free of charge, to any person obtaining a copy
# of this software and associated documentation files (the "Software"), to deal
# in the Software without restriction, including without limitation the rights
# to use, copy, modify, merge, publish, distribute, sublicense, and/or sell
# copies of the Software, and to permit persons to whom the Software is
# furnished to do so, subject to the following conditions:

# The above copyright notice and this permission notice shall be included in all
# copies or substantial portions of the Software.

# THE SOFTWARE IS PROVIDED "AS IS", WITHOUT WARRANTY OF ANY KIND, EXPRESS OR
# IMPLIED, INCLUDING BUT NOT LIMITED TO THE WARRANTIES OF MERCHANTABILITY,
# FITNESS FOR A PARTICULAR PURPOSE AND NONINFRINGEMENT. IN NO EVENT SHALL THE
# AUTHORS OR COPYRIGHT HOLDERS BE LIABLE FOR ANY CLAIM, DAMAGES OR OTHER
# LIABILITY, WHETHER IN AN ACTION OF CONTRACT, TORT OR OTHERWISE, ARISING FROM,
# OUT OF OR IN CONNECTION WITH THE SOFTWARE OR THE USE OR OTHER DEALINGS IN THE
# SOFTWARE.
import sys

import Adafruit_DHT

# Parse command line parameters.
sensor_args = { '11': Adafruit_DHT.DHT11,
                '22': Adafruit_DHT.DHT22,
                '2302': Adafruit_DHT.AM2302 }
if len(sys.argv) == 4 and sys.argv[1] in sensor_args:
        sensor = sensor_args[sys.argv[1]]
        pin = sys.argv[2]
        id = sys.argv[3]
else:
        print 'usage: sudo ./Adafruit_DHT.py [11|22|2302] GPIOpin# metern_id'
        print 'example: sudo ./Adafruit_DHT.py 2302 4 8 - Read from an AM2302 connected to GPIO #4 and metern id 8'
        sys.exit(1)

# Try to grab a sensor reading.  Use the read_retry method which will retry up
# to 15 times to get a sensor reading (waiting 2 seconds between each retry).
humidity, temperature = Adafruit_DHT.read_retry(sensor, pin)

# Note that sometimes you won't get a reading and
# the results will be null (because Linux can't
# guarantee the timing of calls to read the sensor).
# If this happens try again!
if humidity is not None and temperature is not None:
        print '{0}_1({1:0.1f}*C)'.format(id, temperature)
        print '{0}_2({1:0.1f}*%)'.format(id, humidity)
else:
        print 'ERROR'
sys.exit(1)
diamo i permessi in esecuzione al file:
sudo chmod +x /usr/local/bin/ADHT_metern.py
La modalità di utilizzo dello script è:
ADHT_metern.py “tipo sensore 21 o 22” “porta GPIO” “meterID”
Testiamo il sensore, supponendo che come da schema precedente, si tratti di un sensore DHT22, collegato alla GPIO4 e che l'id metern da assegnare sia 6
sudo ADHT_metern.py 22 4 6
6_1(24.2*C)
6_2(74.7*%)
NOTA: in questo caso la numerazione delle porte GPIO è quella standard
Per evitare possibili errori, non utilizziamo direttamente il file python appena creato, ma creiamo uno script bash come il seguente, che invoca il file python con all’interno un controllo per evitare dati errati ed infine andremo con cron ad invocare il seguente script:
nano /usr/local/bin/dht22.sh
- /usr/local/bin/dht22.sh
#!/bin/sh
DATA="$(ADHT_metern.py $1 $2 $3)"
#echo $DATA

if [ x"$DATA" != x ] && [ "$DATA" != "ERROR" ]; then
    echo $DATA | cut -f 1 -d\ > /dev/shm/metern$3.txt
    echo $DATA | cut -f 2 -d\ >> /dev/shm/metern$3.txt
fi
Crtl+O per salvare e CRTL+X per uscire
Impostare i permessi in esecuzione:
sudo chmod +x /usr/local/bin/dht22.sh
Impostare cron per eseguire periodicamente (ogni 5 minuti) la lettura dei valori, creando il seguente file e se necessario modificando opportunamente le parti in rosso.
nano /etc/cron.d/dht22
#!/bin/bash

SHELL=/bin/bash
PATH=/usr/local/bin:/usr/local/sbin:/sbin:/bin:/usr/sbin:/usr/bin
MAILTO=""
# Minute  Hour    Day of Month   Month              Day of Week        User   Command
# (0-59)  (0-23)  (1-31)         (1-12 or Jan-Dec)  (0-6 or Sun-Sat)
4,9,14,19,24,29,34,39,44,49,54,59 * * * * root /usr/local/bin/dht22.sh 22 4 6 > /dev/null 2>&1
Crtl+O per salvare e CRTL+X per uscire
Per fare in modo che lo script venga invocato anche all’avvio del Raspberry è necessario inserire l'avvio anche in rc.local
Utilizzando Putty, colleghiamoci al Raspberry ed eseguiamo quanto segue.
nano /etc/rc.local
Editare il file /etc/rc.local aggiungendo la seguente riga prima della riga “exit 0”:
sudo /usr/local/bin/dht22.sh 22 4 6
Premere ctrl+O per salvare e ctrl+X per uscire
Infine, su meterN si configurano 2 sensori (temperatura e umidità) con i seguenti comandi:
Per la temperatura
Main pooling:
Command: cat /run/shm/metern6.txt | grep C
Dashboard live pooling
Live command: cat /run/shm/metern6.txt | grep C
Per l’umidità
Main pooling:
Command: cat /run/shm/metern6.txt | grep %
Dashboard live pooling
Live command: cat /run/shm/metern6.txt | grep %


